When we began this venture, we knew it was a gamble. This is our first turn at refinishing a tub, and we knew we might have to settle for less-than-professional results. This was okay by us, because we love a good DIY challenge and the satisfaction that comes from tackling something yourself, even if it’s not 100% perfect in the end.
Because our tub only had minor chips inside, we were reassured by many people that just a wee bit of porcelain filler and touch-up glaze would be plenty enough to get our Clementine back in working order.
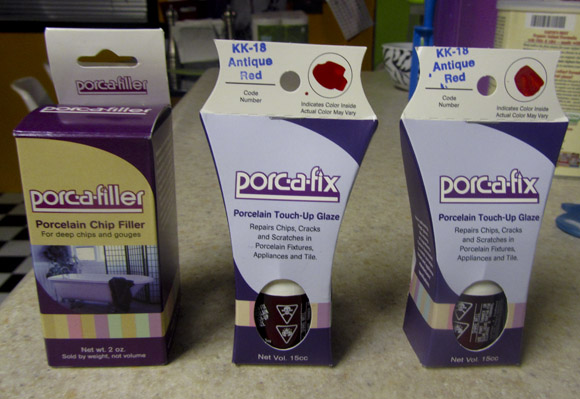
So with confidence we ordered the products you see above, and after cleaning our tub and removing the claw feet, we set into action repairing the chips late one evening.
We let it dry for 24 hours (though the instructions say you can wait just a couple of hours in the right conditions — we wanted to give it every chance to dry) and returned to sand the spots and apply the glaze.
The filler smoothed in like a breeze — it had the consistency of a thick Elmer’s glue. The instructions call for a putty knife or spatula, but we used a painter’s knife dug up from an old oil painting set, which for the size of the chips was more than perfect.
This is where we made our first mistake.
The instructions call for 220-grit sandpaper, and illustrations show a small, circular piece being used. Instead of purchasing what was described, we bought a very-fine grit sanding sponge and assumed that would be the same thing.
It wasn’t.
The sponge didn’t allow for the precision needed to carefully sand the filler without scratching the existing finish. It was also very hard to tell if the filler was smooth to below the chip line, leaving room for the glaze to smoothly blend with the existing finish.
After sanding and more sanding, we were only scratching up the interior of Clementine, leaving her slightly worse for the wear. We trudged on though, cleaning the sanded filler out of the tub and breaking out the glaze, assuming a thin coat of the glaze over the scratched areas would just smooth everything out.
Well, you know what they say about assumptions.
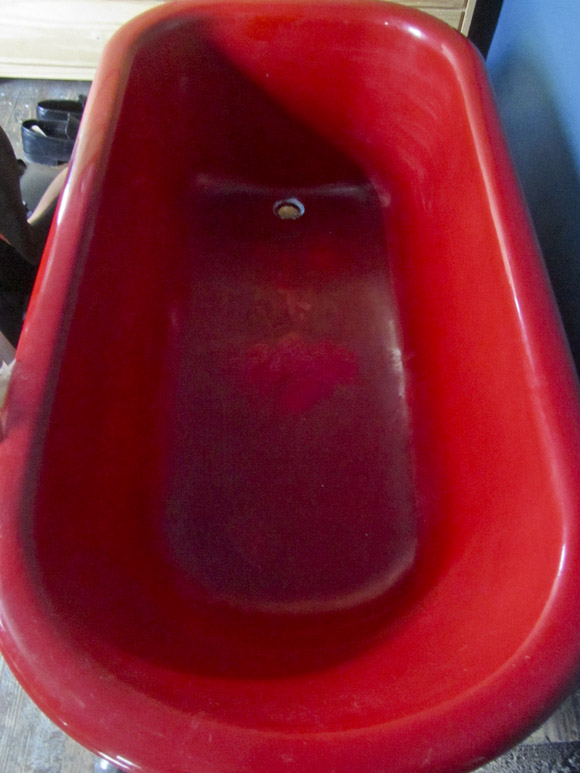
Two things went wrong at this juncture: first, the glaze didn’t match the outside of the tub. Silly us, we assumed (there it is again) that the WHOLE tub was glazed the same color, but as we brushed the nail-polish consistency over the outside scratches, the disparity in tone was very apparent. The best we can guess is that the outside is painted a very similar color to the glaze on the inside.
Second, we were a wee bit heavy-handed in our application on the inside of the tub (which the instructions CLEARLY STATE not to do, but our idea of a thin coat is apparently slightly off) and the glaze looked pretty much like a rushed manicure.
With the glaze is a very small piece of garnet paper, used to smooth the glaze to get it to match your existing finish. Well, the piece was no where near large enough for our needs and the new glaze just made it painfully apparent that time had been less friendly to Clementine than we initially understood.

Now, we’re looking at repainting the outside of the tub to hide the tiger-stripes the glaze caused. As for the interior of Clem, we have two options — to sand everything down again and re-glaze the entire tub; or to buy an epoxy kit to recoat her insides white.
We want to make clear, however, that this in no way is a reflection upon the products we bought — in fact, when we contacted the parent company to inquire about larger quantities of glaze, they were more than friendly, knowledgeable, and helpful with our queries, relieving a great deal of the stress that evolved from things not going exactly according to plan. It really was a lack of attention to detail and user error that granted us our less-than-stellar results.
Here’s where we want to hear from you — what would you do to save Clementine? Would you re-glaze her insides red, or just epoxy her white? Let us know your vote in the comments, and stick around for part two, where we show our other big mistake to date.

No Comments