The four smartest fixes to double your usable garage space are sorting items by access frequency, mounting heavy-duty wall systems, installing structural ceiling racks, and converting attic space with a motorized platform.
Implementing these methods moves seasonal gear off the floor, instantly reclaiming room for vehicles. It also gives you space to handle routine maintenance and check your car for safety before hitting the road without having to work around boxes, bikes, and other clutter.
Almost eight in 10 newer homes have garages, yet we all still squeeze past the familiar chaos at some point. Storage bins stack three feet into the parking spot, bikes tangle with hockey sticks, and holiday decor colonizes the workbench.
The issue is rarely a genuine lack of square footage. Most garages treat the concrete floor as the primary storage zone, which guarantees a bottleneck.
Reclaiming that space does not require knocking down walls or pulling permits. By applying a few low-sweat weekend projects and robust storage solutions recommended by Inventive Garage, the floor clears out completely.
For instance, shifting heavy seasonal totes into the rafters with a reliable steel lift instantly frees up massive floor space while keeping frequently used areas accessible.
1. Sort by Frequency of Use
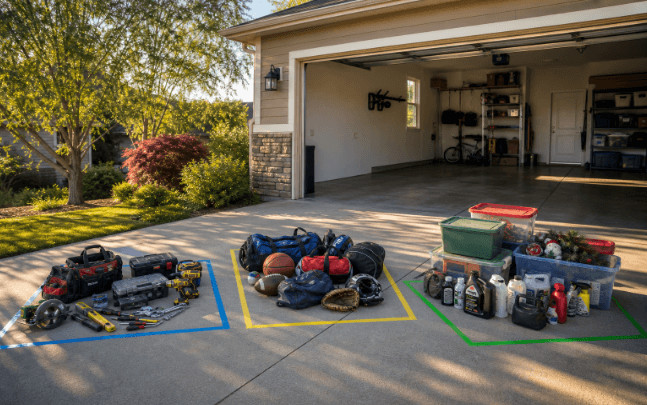
Let us name the actual problem honestly, as everything piles together because sorting felt like extra work at the time.
When looking for garage organization ideas, the instinct is usually to start buying racks and screwing them into the drywall. But installing storage before sorting your gear guarantees you will just be reorganizing the same clutter six months from now.
Before you pick up a drill, you have to establish a frequency of use framework.
This framework is the non-negotiable first move that turns random storage into a highly functional system. Break your inventory down into three basic tiers to ensure the most important items stay within immediate reach.
Applying this simple method will dictate exactly what kind of hardware you actually need to buy.
- Daily access tier: These are the things you reach for without thinking. Keys, dog leashes, go-to hand tools, and charging cables belong on eye-level hooks. Keep them in small labeled bins right near the entry point.
- Weekly use tier: Bikes, sports bags, brooms, and automotive cleaning supplies fit here. These items need to be off the concrete but reachable without moving anything else. Wall racks and dedicated floor stands serve this tier perfectly.
- Seasonal and annual tier: Holiday decor, camping gear, spare wheel sets, and heavy luggage belong out of the way. These items belong exclusively in overhead zones or upper attic space. They should never occupy your floor or eye-level real estate.
To make this work, be completely ruthless with your belongings. Pull everything out of the garage, line it up on the driveway, and apply the frequency test item by item.
Donate or discard anything that has not been touched in two years. Sorting alone typically clears significant floor space before a single dollar is spent or a wall is drilled.
| Key Insight: Don’t buy storage first, sort by frequency. Assign daily items to eye level, weekly gear to walls, and seasonal gear overhead. This system keeps the floor clear, not just organized. |
2. Put Your Walls to Work for Tools
Most home garages treat walls like interior wallpaper instead of highly functional storage areas. They remain flat, inert, background surfaces that waste massive amounts of potential organization space.
To build effective garage wall storage, you need to reframe how you view that vertical real estate. Treat your walls like a vertical truck bed with structural mounting points ready to carry heavy loads.
You can activate your walls in several ways, depending on what needs hanging. Each method offers different benefits for your weekly use tier.
Consider these three primary approaches to get your bulky gear off the concrete.
- Slatwall panels: A quality slatwall garage system features horizontal aluminum grooves that accept interchangeable hooks and bins. Because they rearrange by season without requiring new hardware, they are ideal for oddly shaped items. Panel systems must be screwed directly into studs at sixteen-inch intervals.
- Track and rail systems: These rely on heavy-duty steel tracks equipped with adjustable hook arms for bikes and step stools. They offer higher load capacity per mounting point than slatwall panels. This makes them the better choice for isolating heavier individual items.
- Lockable steel wall cabinets: Best mounted directly above your workbench, these handle power tools and detailing supplies. They are perfect for anything that benefits from remaining dust-free or out of reach of children.
Reviewing professional-grade load capacities is essential when mapping out your configuration. Whatever system you choose, the mounting rules remain the same across the board.
Locate and mark your studs before drilling, as a reliable stud finder costs less than repairing a collapsed rack. Use lag screws driven securely into the framing, and never rely on drywall anchor shortcuts for live loads.
Always use a level to ensure your installation looks intentional and clean.
A slightly tilted slatwall panel will drive you quietly insane every time you look at it. Once the walls carry the weekly gear, the floor opens up enough to park a vehicle comfortably.
Now you can tilt your head back and look at the ceiling.
3. Hoist Bulky Seasonal Items onto Racks
The ceiling is the most consistently overlooked storage zone in residential garages. It offers a massive, flat, empty surface with heavy framing sitting directly behind the drywall.
Activating your overhead garage storage yields an incredible visual payoff that instantly transforms the room. Seasonal tubs and camping chairs float safely above the hood of your truck, completely out of the traffic pattern.
Getting this right requires real installation specificity so you can approach the project confidently. Every piece of hardware must be capable of handling significant weight without warping.
Keep these critical steps in mind when selecting and hanging ceiling garage racks.
- Choosing the right platform: Stick to all-steel construction with a powder-coated finish for long-term corrosion resistance. Standard platforms rated for high weights handle multiple heavy totes without flexing. Look for adjustable hanging rods that can accommodate varying ceiling heights.
- Checking garage joist spacing: Ceiling joists in attached garages typically run perpendicular to the garage door. Use your stud finder to confirm the location and spacing across the ceiling. Always verify by probing with a small nail at the joist edge before committing to the final mounting hole.
- Fastening with appropriate hardware: Drive your lag bolts into the dead center of the joists to ensure maximum bite. Never anchor into drywall, thin strapping, or insulation batts under any circumstances. For a fully loaded platform, you must tie into a minimum of four distinct joists to distribute the weight safely.
- Confirming operational clearance: Allow at least twelve inches of drop from the ceiling surface to stay clear of moving parts. This keeps the rack completely clear of the garage door opener rail and trolley. Always measure the maximum height of the opener first, then calculate the platform drop position.
Reviewing overhead storage options helps establish what a safe setup looks like before you buy. Keep in mind that for a moderate load, the maximum span is 10 feet between supports.
Furthermore, every component must support without failure its own weight and the maximum intended load. A solid afternoon of measuring and hanging delivers immediate floor relief.

4. Turn the Attic into a Safe Storage Bay
Ceiling racks handle the bulky, medium-frequency items perfectly. But for the heavy deep storage gear that you only touch once or twice a year, the attic above the garage is the ideal destination.
Unfortunately, most homeowners leave this massive square footage completely untouched. It isn’t because the room doesn’t exist; it is because accessing it is genuinely dangerous.
Carrying forty-pound holiday totes up a step ladder is exactly how shoulders get separated and ankles get rolled. It is not a character flaw to avoid that chore; it is just a reasonable risk assessment.
Those deep storage items tend to be awkward to carry one-handed while climbing. Furthermore, ladder access requires a spotter, excellent lighting, and perfect footing.
The smartest solution for an attic storage lift is to eliminate the climb with a motorized platform.
Instead of carrying weight up, the platform descends to floor level and loads at a comfortable ergonomic height. It then carries the weight back up into the rafters without you ever putting a hand on a ladder rung.
A properly rated steel lift handles massive weight per cycle, featuring self-locking safety mechanisms that stop travel automatically.
When planning for a motorized attic lift, safety and structural integrity lead the process.
Measure your ceiling joist dimensions and spacing carefully before ordering the equipment. Check carefully to see whether your garage door opener rail bisects the intended ceiling hatch opening.
Finally, keep in mind that a dedicated electrical circuit is required to power the motor safely.
Bringing in a licensed electrician or structural contractor for the wiring is always the right call. The ceiling acts as a load-bearing structure in both directions when a loaded platform is in motion.
An attic lift handles the deep storage items, ceiling racks hold the seasonal gear, walls organize the tools, and floor bins catch the daily items. Each zone serves its specific frequency tier, allowing the floor to remain completely clear.
| Warning/Important: Never carry heavy totes up a ladder. A motorized attic lift with self-locking safety mechanisms and a dedicated electrical circuit eliminates the fall risk and handles up to 350 lbs safely. |
Making It Happen
Transforming your setup requires a realistic, sequenced build schedule rather than just vague motivation. Treat this as a true garage storage weekend project to get the job done right.
Follow this timeline to efficiently tackle the mess and reclaim your square footage.
- Saturday morning: Execute the full purge and sort. Empty every bin, build your frequency piles on the driveway, and discard anything that fails the test. This is the unglamorous move that makes everything else faster.
- Saturday afternoon: Install the wall storage. Locate your studs, hang your slatwall panels, mount your hooks, and load the weekly use gear onto its new permanent home.
- Sunday morning: Bolt your ceiling racks directly into the overhead joists. Hoist the seasonal bulk items and double-check all lag screws against the rated load capacity.
- Sunday afternoon: Measure your attic joist spacing and hatch opening dimensions. If your motorized lift is on site and the electrician is scheduled, begin the installation prep to finish the build.
The long game maintenance rule for seasonal storage garage organization is incredibly simple. Every new item you bring into the shop gets an assigned home immediately.
If it does not fit into the system, something old has to leave. Sticking to this strict boundary ensures your newly cleared space stays pristine for years to come.
| Author Profile: Inventive Garage is a specialized online retailer offering comprehensive garage and workshop storage solutions, organization systems, and space optimization products. |